Monday, July 19, 2021

How JavaScript works: Event loop and the rise of Async programming

 What is the Event Loop?

We’ll start with a somewhat of an odd claim — despite allowing async JavaScript code (like the setTimeout), until ES6, JavaScript itself has actually never had any direct notion of asynchronicity built into it. The JavaScript engine has never done anything more than executing a single chunk of your program at any given moment.

For more details on how JavaScript engines work (Google’s V8 specifically).


So, who tells the JS Engine to execute chunks of your program? In reality, the JS Engine doesn’t run in isolation — it runs inside a hosting environment, which for most developers is the typical web browser or Node.js. Actually, nowadays, JavaScript gets embedded into all kinds of devices, from robots to light bulbs. Every single device represents a different type of hosting environment for the JS Engine.

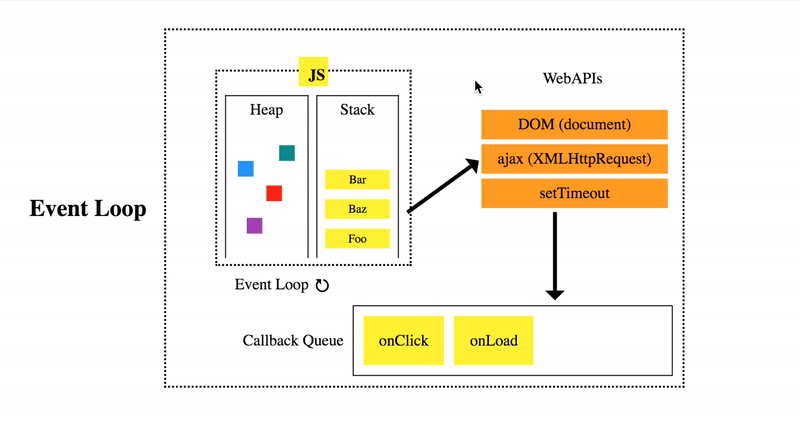
The common denominator in all environments is a built-in mechanism called the event loop, which handles the execution of multiple chunks of your program over time, each time invoking the JS Engine.

This means that the JS Engine is just an on-demand execution environment for any arbitrary JS code. It’s the surrounding environment that schedules the events (the JS code executions).

So, for example, when your JavaScript program makes an Ajax request to fetch some data from the server, you set up the “response” code in a function (the “callback”), and the JS Engine tells the hosting environment:
“Hey, I’m going to suspend execution for now, but whenever you finish with that network request, and you have some data, please call this function back.”

The browser is then set up to listen for the response from the network, and when it has something to return to you, it will schedule the callback function to be executed by inserting it into the event loop.

Monday, May 25, 2020

Angular component Lifecycle Hooks

Lifecycle Hooks

  1. ngOnChanges()
    • Used in pretty much any component that has an input.
    • Called whenever an input value changes
    • Is called the first time before ngOnInit
  2. ngOnInit()
    • Used to initialize data in a component.
    • Called after input values are set when a component is initialized.
    • Added to every component by default by the Angular CLI.
    • Called only once
  3. ngDoCheck()
    • Called during all change detection runs
      • A run through the view by Angular to update/detect changes
  4. ngAfterContentInit()
    • Called only once after first ngDoCheck()
    • Called after the first run through of initializing content
  5. ngAfterContentChecked()
    • Called after every ngDoCheck()
    • Waits till after ngAfterContentInit() on first run through
  6. ngAfterViewInit()
    • Called after Angular initializes component and child component content.
    • Called only once after view is initialized
  7. ngAfterViewChecked()
    • Called after all the content is initialized and checked. (Component and child components).
    • First call is after ngAfterViewInit()
    • Called after every ngAfterContentChecked() call is completed
  8. ngOnDestroy()
    • Used to clean up any necessary code when a component is removed from the DOM.
      • Fairly often used to unsubscribe from things like services.
    • Called only once just before component is removed from the DOM.

Thursday, December 19, 2019

How to apply multiple template bindings on one element in angular

Can't use two template binding on one element in Angular 2 (like *ngIf and *ngFor). 
you need to create ng element over your code (td , li)


<ng-container *ngIf="condition">
    <li *ngFor="let item of items">
        {{item}}
    </li>
</ng-container>

Thanks

Monday, December 16, 2019

Change Selector prefix with Angular CLI

Hey

Use this cmd line for changing default prefix app to your company name  or tag

 ng new my-app --prefix compantName 

Tuesday, August 13, 2019

Dynamic set / update filter value in gridfilter extjs

Hello,

We have added the following functionality to the GridFilters
 
Each filter has SetActive and SetValue methods which can be used to set filter value during AjaxEvent
 
On client side you can use the following functions to set filter
 
grid.clearFilters();
grid.getFilter('dataindex').setValue("value"); //string filter
grid.getFilter('dataindex').setValue(true); //bool filter
grid.getFilter('dataindex').setValue({gt:2, lt:9, eq:5}); //numeric filter
grid.getFilter('dataindex').setValue({before: new Date(2008,0,1), after:..., on:...}); //date filter
grid.getFilter('dataindex').setValue(['item1', item2]); //list filter

grid.getFilter('dataindex').setActive(false); //turn off filter
Comments are always welcome :) 

Thursday, May 30, 2019

Custom Checkbox Css with and without label


Demo

HTML for checkbox is

With Label

<div class="boxes withlabel">
  <input type="checkbox" id="rj-1">
  <label for="rj-1">Hello World</label>

  <input type="checkbox" id="rj-2" checked>
  <label for="rj-2">RJ Code for every one </label>

  <input type="checkbox" id="rj-3">
  <label for="rj-3">Checkbox with label</label>
</div>


With out Label

<div class="boxes without">
  <input type="checkbox" id="box-1">
  <input type="checkbox" id="box-2" checked>

  <input type="checkbox" id="box-3">
</div>

CSS

/* With label Checkboxes styles*/

.withlabel input[type="checkbox"] { display: none; }

.withlabel input[type="checkbox"] + label {
  display: block;
  position: relative;
  padding-left: 35px;
  margin-bottom: 20px;
  font: 14px/20px 'Open Sans', Arial, sans-serif;
  color: #fff;
  cursor: pointer;
  -webkit-user-select: none;
  -moz-user-select: none;
  -ms-user-select: none;
}

.withlabel input[type="checkbox"] + label:last-child { margin-bottom: 0; }

.withlabel input[type="checkbox"] + label:before {
  content: '';
  display: block;
  width: 20px;
  height: 20px;
  border: 2px solid #fff;
  position: absolute;
  left: 0;
  top: 0;
  opacity: .6;
  -webkit-transition: all .12s, border-color .08s;
  transition: all .12s, border-color .08s;
}

.withlabel input[type="checkbox"]:checked + label:before {
  width: 10px;
  top: -5px;
  left: 5px;
  border-radius: 0;
  opacity: 1;
  border-top-color: transparent;
  border-left-color: transparent;
  -webkit-transform: rotate(45deg);
  transform: rotate(45deg);
}


/* With out Checkboxes styles*/

.without input[type="checkbox"] {
  display: block;
  position: relative;
  margin-bottom: 20px;
  width:0;
  cursor: pointer;
}

.without input[type="checkbox"]:last-child { margin-bottom: 0; }

.without input[type="checkbox"]:before {
  content: '';
  background:#F46A4A;
  display: block;
  width: 20px;
  height: 20px;
  border: 2px solid #fff;
  position: absolute;
  left: 0;
  top: 0;
  -webkit-transition: all .12s, border-color .08s;
  transition: all .12s, border-color .08s;
}

.without input[type="checkbox"]:checked:before {
  width: 10px;
  top: -5px;
  left: 5px;
  border-radius: 0;
  opacity: 1;
  border-top-color: transparent;
  border-left-color: transparent;
  -webkit-transform: rotate(45deg);
  transform: rotate(45deg);
}

Enjoy Comments are welcome :)

Thursday, February 21, 2019

Error in creating angular component from CLI

Error code is:


More than one module matches. Use skip-import 
option to skip importing the component into the 
closest module.

This Error is related to component module file When we have multiple module file (more than one) then auto generated component is missing module path so we need to give module path with component name like :

 ng g c ./feature/ComponentName --module modulePath

For Example

ng g c ./feature/metric-detail --module app 

comments are always welcome :)